


Hydroponic hanging is a soilless cultivation method where plants are suspended in hanging containers and fed nutrient-rich water solutions directly to their roots. This approach maximizes vertical space and uses hydroponic hanging systems to grow herbs, greens, and ornamentals in compact areas with controlled nutrients and light.
Hydroponic hanging systems matter for urban gardeners and commercial growers because they increase yield per square foot and reduce water use. This guide covers beginner-friendly hydroponic hanging system guides, essential equipment lists, step-by-step setup tips, benefits and limitations, cost estimates, and practical maintenance advice to drive confident purchases and conversions.
Fundamentals of Hydroponic Hanging Systems
Core Components and Definitions
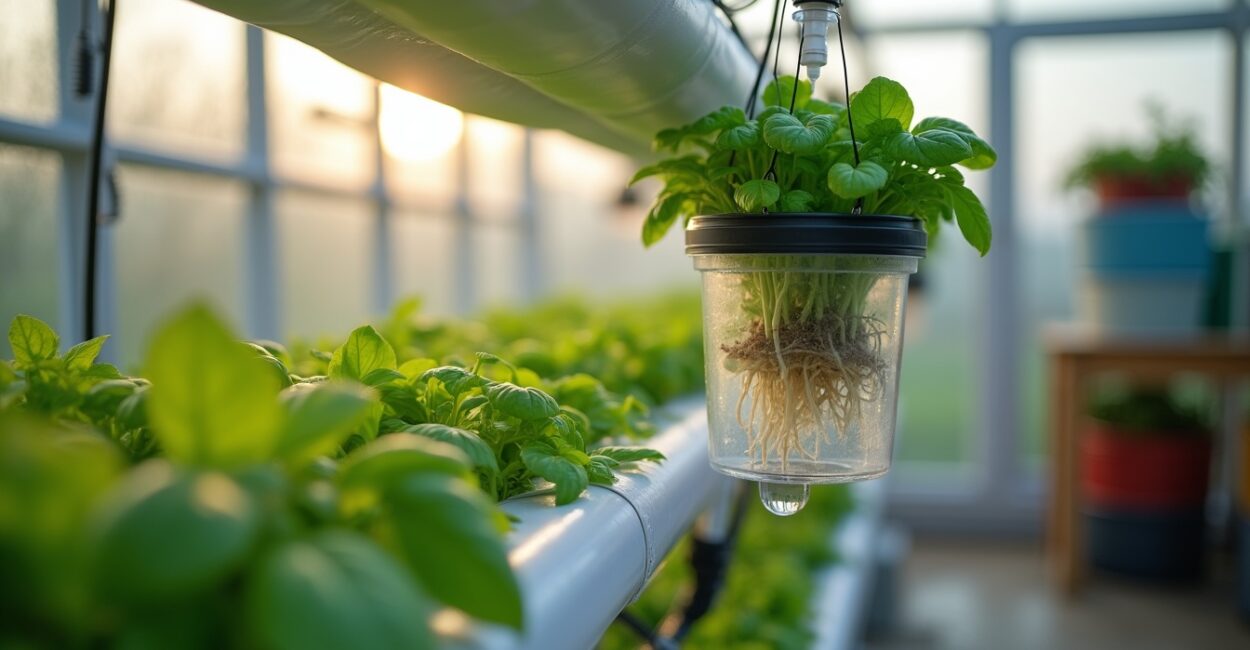
Hydroponic hanging systems rely on a few core components: suspended containers or baskets, a nutrient reservoir, a delivery method (drip, NFT, or ebb-and-flow), and lighting when indoors. The suspended container supports the plant and medium while roots hang into nutrient solution or drip lines. Knowing these parts simplifies selection and troubleshooting when building a hanging garden.
Beginners should prioritize reliable hangers and water-proof reservoirs to avoid leaks. Choose inert media like rockwool, coco coir, or clay pebbles to stabilize roots without soil-borne pathogens. Dica de Especialista: measure load capacity of ceiling anchors before installation to prevent accidents.
Understanding terminology—pH, EC (electrical conductivity), nutrient solution, and root aeration—helps interpret product specs and set up an efficient hydroponic hanging system. Regular measurements of pH and EC ensure nutrient uptake and healthy growth.
- Suspended containers (pots, baskets, grow bags)
- Nutrient reservoir and submersible pump
- Growing medium (coco, rockwool, LECA)
- Pump, tubing, and fittings for delivery
- Lighting (LEDs) and anchors/hangers
How Hydroponic Hanging Differs from Other Hydroponics
Hydroponic hanging emphasizes vertical orientation: plants grow suspended, often with roots dangling into nutrient flow. Unlike horizontal NFT gutters or tabletop DWC (deep water culture), hanging systems exploit height for density. This distinction changes irrigation timing, reservoir placement, and support hardware compared to bench systems.
In practice, hanging setups reduce footprint by up to 60% compared to traditional bench systems in urban settings, enabling multi-tiered vertical configurations. Segundo industry reports, vertical and hanging systems can increase yield per square meter substantially for leafy greens.
Design choices—gravity-fed vs pump-fed, passive wick vs active drip—affect maintenance frequency and energy use. Choose a style aligned with your space, budget, and desired crop rotation speed.
Common Crops for Hanging Hydroponics
Hydroponic hanging systems favor lightweight, fast-growing crops like basil, lettuce, parsley, strawberries, and certain ornamentals. Vining plants (e.g., cherry tomatoes) can also work with proper support and pruning. Choose crops with shallow root systems for easier suspension management.
Na prática: start with leafy herbs and salad greens for quick wins—these mature in 4–6 weeks and showcase ROI to new growers. According to a controlled study, hydroponically grown basil can have 20–40% faster growth rates versus soil-grown counterparts (research reference).
Selecting compatible cultivars reduces nutrient fluctuation and simplifies scheduling harvests, improving both home and small commercial operations.
Step-by-step Hydroponic Hanging System Setup
Planning Your Hydroponic Hanging Layout
Plan placement with weight, light, and access in mind. Map hanging points at rafters or sturdy beams with at least a 30–50 cm clearance between plant tiers. Account for the reservoir location (lower than plants for gravity-fed systems) and ensure access for reservoir refills and pH/EC monitoring.
Na prática: sketch the space and mark electrical outlets and grow-light positions. Consider adding a drip tray or waterproof mat under the system to protect floors from spills. This foresight saves time during installation and reduces retrofit costs.
Measure expected load: each mature plant plus container may weigh 2–5 kg depending on water retention—use anchors rated 2–3x the expected load per point for safety.
Installation: Anchors, Supports, and Safety
Install ceiling anchors or rails using expansion bolts or joist hangers rated for dynamic loads. Use stainless steel S-hooks or carabiners with load ratings. Safety matters: check anchors monthly and avoid DIY anchors in drywall without joist support.
Dica de Especialista: use a distribution rail and adjustable ratchet hangers for leveling and ease of maintenance. This prevents slumping and allows quick height adjustments for different crops and light distances.
Ensure electrical cords and water lines are separated to reduce shock and mildew risks. Use GFCI outlets for all pumps and lights as required by building codes.
Plumbing and Irrigation Setup
Choose a delivery method: drip emitters, nutrient film technique (NFT) channels adapted for hanging, or periodic flood-and-drain via small reservoirs. Install tubing from reservoir pump to each pot and return lines to avoid stagnant pockets. Prime and test lines before planting.
In practice, drip systems offer predictable dosing for individual pots while NFT-style hanging channels maximize root exposure to flowing solution. Use check valves and filter screens to prevent clogging from micro-particles in nutrient mixes.
Set a schedule: many beginners run pumps 15–30 minutes every 1–2 hours, adjusting for crop needs and ambient temperature to maintain root oxygenation and nutrient availability.
Comparing Hydroponic Hanging Methods and Equipment
Overview of Hanging Method Options
Hanging hydroponic methods include suspended DWC, drip-to-waste, recirculating drip, and NFT-style hanging channels. Each balances simplicity, water efficiency, and control. For beginners, recirculating drip often hits the sweet spot between reliability and resource use.
Consider maintenance: DWC requires frequent oxygenation and monitoring; drip systems need emitter maintenance; NFT-style requires consistent slope and flow. These trade-offs guide equipment purchases and ongoing time investment.
Tip: start with a modular kit that can be scaled, enabling experiments with multiple methods before committing to a large, fixed installation.
Equipment Comparison Table
| Method | Suitability | Maintenance Level |
|---|---|---|
| Recirculating drip | Beginner to intermediate | Moderate |
| NFT-style hanging | Leafy greens, experienced installers | High (flow consistency) |
| Suspended DWC | Small herbs, experimental setups | Moderate to high (oxygenation) |
| Passive wick (hanging) | Low-maintenance, small plants | Low |
Choosing Pumps, Timers, and Lights
Select a submersible pump sized to the number of emitters and tubing length—consider head height and flow rate. Use programmable timers (digital, 15-minute resolution) to control cycles. For lighting, full-spectrum LED panels at 25–40 µmol/m²/s for herbs or 150–300 µmol/m²/s for productive greens are typical indoors.
Na prática: opt for energy-efficient LED fixtures to lower operating cost—LEDs can reduce energy use by up to 50% compared to HPS in comparable setups (DOE).
Integrate a backup battery or secondary pump in commercial setups to prevent crop loss during power outages; even a 2–4 hour outage can stress sensitive plants and reduce yields.
Benefits and Business Case for Hydroponic Hanging
Productivity and Yield Advantages
Hydroponic hanging increases planting density and can boost yields per square meter. Vertical spacing and optimized nutrient delivery accelerate growth cycles—many leafy crops complete harvest in 4–6 weeks. For commercial growers, this faster turnover can mean more harvests per year.
Segundo industry analysis, vertical and stacked systems can increase yield density by 200–400% compared to conventional surface agriculture in urban environments. This makes hydroponic hanging attractive for farm-to-table operations.
Use crop selection and light scheduling to further compress crop cycles and improve revenue per square foot, supporting a quicker return on initial equipment investment.
Environmental and Resource Efficiency
Hydroponic hanging consumes less water than conventional agriculture—recirculating systems can reduce water use by 70–90%. Nutrients are delivered precisely, minimizing runoff and fertilizer waste. This efficiency appeals to eco-conscious consumers and urban regulators aiming to reduce food miles.
In practice, closed-loop recirculating systems capture and reuse over 85% of nutrient solution when properly managed, reducing both nutrient costs and environmental impact. Monitor EC and top up water to maintain concentration.
These benefits translate to lower operating costs and stronger sustainability claims for retailers and growers seeking certification or green branding.
Advantages: Why Choose Hanging Hydroponics
- Higher yield per square meter through vertical stacking
- Reduced water consumption by up to 90% (recirculating)
- Faster crop cycles—common harvests in 4–6 weeks
- Compact footprint ideal for urban and rooftop farms
- Lower pest pressure without soil, reducing pesticide use
- Scalable from hobbyist to commercial operations
Costs, Scalability, and Roi Considerations
Initial Investment and Recurring Costs
Startup costs vary widely: a basic home hydroponic hanging kit may cost $100–$400, while a small commercial system can exceed $5,000–$20,000 depending on automation and lighting. Recurring costs include nutrients (~$10–$40/month for hobby setups), electricity for pumps and lights, and replacement media.
Quanto custa: a typical LED-lit hanging rack uses roughly 50–150 kWh/month depending on scale; factor this into ROI calculations. Segundo USDA, operational economics favor systems optimizing energy and labor.
Budget for contingencies—replace pumps every 2–5 years and LEDs every 5–7 years. Track metrics (yield/kg, energy/kWh, labor hours) to refine profitability models.
Scaling from Hobby to Commercial
Scale by modular expansion: add more hanging rails, reservoirs, and pumps while maintaining flow balance. Use standardized connectors and manifolds to simplify plumbing as systems grow. Plan electrical supply and ventilation before expanding to avoid later upgrades costing more than doubling initial spend.
Na prática: test a single rack for 2–3 crop cycles to refine nutrient recipes and spacing before investing in multiple tiers. This reduces risk and improves system-level efficiency when scaling.
Document SOPs (standard operating procedures) early—maintenance, nutrient mixing, pest checks—to maintain consistency across larger operations and teams.
Technical Specs for Budgeting
| Item | Typical cost (USD) | Replacement cycle |
|---|---|---|
| Basic hanging kit | $100–$400 | 5–7 years |
| Commercial rack + LEDs | $4,000–$20,000 | 5 years |
| Reservoir pump | $30–$250 | 2–5 years |
Challenges, Risks, and Troubleshooting
Common Problems and Quick Fixes
Pests, root rot, clogged emitters, and pH/EC drift are common challenges in hydroponic hanging systems. Troubleshoot by isolating affected plants, flushing lines, and adjusting nutrient concentration or pH. Regular inspections reduce issue escalation.
Dica de Especialista: keep a spare pump and a small toolkit on-site—replacing a failed pump within 1 hour can prevent significant crop stress. Monitor reservoirs daily for debris and algae that clog emits and reduce oxygenation.
Document symptoms and corrective actions to build a troubleshooting library for your system, accelerating resolution of recurrent problems.
Disadvantages and Limitations
- Initial equipment cost can be high for large setups
- Requires electrical supply and backup for pumps/lights
- Higher technical know-how for nutrient and pH management
- Potential for rapid spread of waterborne disease
Limitations include sensitivity to power outages and the need for consistent monitoring. In small urban units, noise from pumps and fans can be an issue and may require insulated enclosures or low-noise pumps.
Plan redundancies (battery backups, secondary pumps) to mitigate these risks and protect crop investment.
Maintenance Schedule and Monitoring Tips
Adopt a weekly and monthly maintenance cadence: daily visual checks and reservoir top-offs, weekly pH and EC readings and filter cleaning, monthly pump inspections and media inspection. Record data to spot trends and preempt problems.
Na prática: set calendar reminders and keep spare consumables (emitters, tubing, media). Many growers achieve stable systems within 3–6 crop cycles with consistent record-keeping.
Use smartphone-compatible meters and controllers where possible to receive remote alerts and reduce downtime from human error.
Best Practices, Buying Guide, and Setup Tips
Beginner-friendly Buying Checklist
Prioritize kits with clear instructions, safety-rated anchors, an appropriately sized pump, and included hangers. Confirm LED light spectrum and PAR output, and choose reservoirs sized at least 10–20 liters larger than estimated daily consumption to allow buffer for evaporation and nutrient stability.
Dica de Especialista: buy modular components with standard fittings (½” or ¾” tubing) to simplify future upgrades. Read reviews and choose vendors with good support policies to reduce learning friction.
Include spare emitters, tubing, and a basic water test kit (pH and EC) in your initial purchase to avoid downtime during your first crop cycles.
Operational Tips to Maximize Conversions
Highlight product benefits in listings: space savings, faster growth, water efficiency, and easy installation. Provide clear kit comparisons and video tutorials to reduce buyer hesitation. Offer starter bundles (kit + nutrients + pH kit) to increase average order value and shorten the buyer learning curve.
Na prática: include a simple 3-week crop plan and a troubleshooting FAQ with every sale. Customers who succeed early are likelier to become repeat buyers and refer others.
Leverage social proof: showcase before/after yield photos and third-party validation to improve conversion rates on product pages.
Top 7 Tips for Reliable Hydroponic Hanging Systems
- Secure anchors to structural beams and use rated hardware
- Maintain consistent pH (5.5–6.5) and EC for target crops
- Start with recirculating drip systems for predictable results
- Use energy-efficient LEDs and schedule lights for crop needs
- Keep spares: pump, emitters, tubing, and basic meters
- Document nutrient recipes and crop performance
- Implement weekly reservoir cleaning and monthly pump checks
Conclusion
Hydroponic hanging systems offer an efficient, space-saving way to grow fresh produce and ornamentals, delivering faster cycles and higher yields per area. Beginners benefit from modular recirculating drip setups, robust anchors, and routine monitoring of pH and EC. This guide presented equipment lists, step-by-step setup tips, advantages, limitations, and budgeting considerations to help you choose and scale a hydroponic hanging system.
Start small, document results, and iterate—then expand confidently. If you’re ready to try hydroponic hanging, gather a starter kit, select fast-growing herbs, and test one rack for two cycles to validate your approach and ROI.
Frequently Asked Questions
What is Hydroponic Hanging?
Hydroponic hanging is a method of growing plants without soil by suspending containers or baskets so roots access nutrient-rich water. It leverages vertical space, uses controlled nutrient solutions, and often recirculates water. This method suits urban and indoor growers who want higher yield density and reduced water use versus conventional soil gardening, and it works well for herbs, greens, and compact fruiting plants.
How Does a Recirculating Hydroponic Hanging System Work?
A recirculating system pumps nutrient solution from a reservoir to emitters or channels feeding suspended pots; excess solution returns to the reservoir for reuse. Timers control pump cycles, while pH and EC meters ensure nutrient balance. Oxygenation via air stones or intermittent flow prevents root hypoxia. Regular monitoring and filtration prevent clogging and disease, enabling efficient reuse of water and nutrients in a closed loop.
What is the Difference Between Hanging Nft and Drip Systems?
Hanging NFT (nutrient film technique) uses a thin flowing film of nutrient solution across channels where roots contact the film; it requires consistent low-head flow and slope. Drip systems deliver discrete doses via emitters into media-filled pots and are more forgiving of flow interruptions. NFT offers high oxygenation for roots but demands precise flow control; drip systems are easier for beginners and for mixed-species plantings.
When Should I Use a Suspended Dwc Versus a Drip Hanging Setup?
Use suspended DWC for small herbs and experiments where simplicity and constant root immersion are acceptable; it provides steady nutrient access but needs robust oxygenation. Choose drip hanging setups when you want per-pot control, scalability, and reduced risk of complete system failure from single-point oxygen loss. Drip systems suit mixed crops and larger arrays where individual dosing is helpful.
How Much Does a Basic Hydroponic Hanging Setup Cost?
Basic home kits typically range from $100 to $400, including containers, a small pump, tubing, and sometimes lights. Small commercial starter racks with LED lighting and automation can cost $4,000–$20,000. Recurring costs—nutrients, electricity, and replacement parts—may be $10–$100 monthly depending on scale. Budget for pumps replacement every 2–5 years and LEDs every 5–7 years.