


Warning: Cannot modify header information - headers already sent in /home/u278635817/domains/myhousegarden.com/public_html/wp-content/plugins/artigosgpt/artigosgpt.php on line 28454
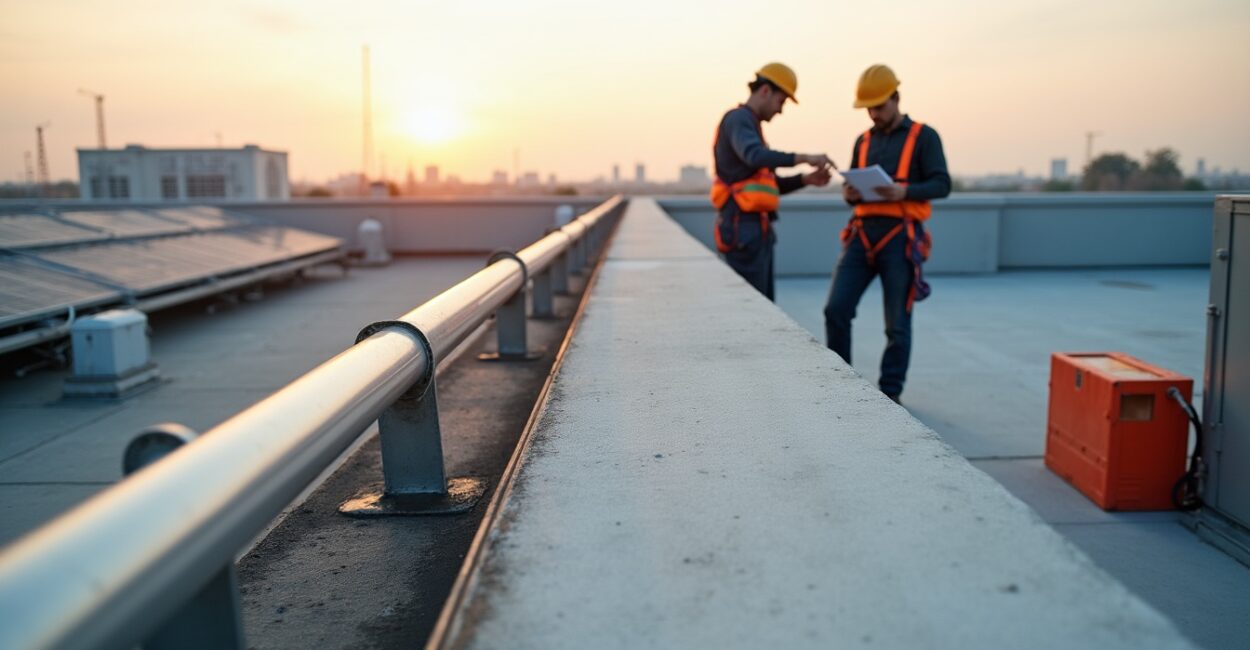
Rooftop safety is critical for any operation performed at height; it prevents falls, ensures compliance, and protects personnel and assets. Understanding what rooftop safety entails, why it matters to building owners and maintenance crews, and how to implement basic measures is the first step to reducing risk and meeting regulatory requirements.
Accidental falls from roofs are a leading cause of workplace injuries in construction and facilities management, so a practical rooftop safety checklist helps teams identify hazards, select protective equipment, and coordinate training. This article outlines regulations, gear, training, and an actionable checklist to start improving rooftop safety today.
Rooftop safety fundamentals and core concepts
- Fall prevention hierarchy: elimination, substitution, engineering controls, administrative controls, PPE
- Common roof hazards: unguarded edges, skylights, wet surfaces, electrical exposures
- Regulatory touchpoints: OSHA standards, local building codes, industry guidance
- Roles and responsibilities: owner, facility manager, supervisor, worker
Understanding basic roof hazards
Rooftop safety begins with recognizing hazards that make roof work dangerous: unprotected edges, fragile roofing materials, skylights, and trip hazards from rooftop equipment. Climatic factors—wind, ice, or rain—also increase slip risk and complicate rescue. Identifying hazards is the foundation of risk assessment and determines the controls needed, from guardrails to harness systems and work scheduling to avoid high-wind tasks.
To be effective, hazard recognition should be systematic: inspect access points, walking paths, roof penetrations, and anchor locations before each job. Use checklists and photographic records to document conditions and any changes over time. Ensure that hazard identification is integrated into permits and pre-work briefings so everyone on site understands what to expect.
Include rooftop safety in routine maintenance cycles and after severe weather events. When hazards are noted, prioritize remediation using the hierarchy of controls: remove the risk if possible, otherwise apply engineering or administrative controls, and finally, ensure proper PPE for residual risk.
Key legal and regulatory considerations
Regulations shape rooftop safety programs: in the U.S., OSHA standards such as 29 CFR 1926 and 1910 contain fall protection requirements for many rooftop tasks, while local building codes may require guardrails or parapet heights. For commercial buildings, owners must also consider access and egress obligations under local authority having jurisdiction. Noncompliance can lead to fines, work stoppages, and liability exposure.
Understanding which standard applies depends on the work type and industry. For example, maintenance under 29 CFR 1910.132 differs somewhat from construction under 29 CFR 1926. Consult authoritative guidance and, where necessary, a legal or safety consultant to interpret requirements for your specific operations.
Maintain documentation—policies, training records, inspections, and rescue plans—to demonstrate due diligence. Documented programs reduce liability and support continuous improvement by tracking incidents, near-misses, and corrective actions implemented after inspections or audits.
Roles, responsibilities, and communication
Clear roles are essential: building owners set policy and invest in controls, managers implement procedures and schedule work, supervisors enforce PPE and safe practices, and workers execute tasks following training. A rooftop safety program must define responsibilities for inspections, permit issuance, equipment maintenance, and incident reporting.
Effective communication includes pre-shift briefings, permit-to-work systems, and visible signage at rooftop access points. Use digital logs or mobile apps to record inspection results and confirm that corrective actions were taken. Regular safety meetings keep rooftop safety visible and reinforce expectations.
Assign a qualified person for rooftop oversight who can perform risk assessments and authorize work. That person should have the authority to stop work if conditions become unsafe and to coordinate rescue if an incident occurs.
Rooftop safety procedures and step-by-step operations
- Conduct a formal site-specific risk assessment before any rooftop work.
- Secure required permits and verify weather and access conditions.
- Install engineering controls first (guardrails, barriers) where feasible.
- Deploy fall protection systems and verify anchor capacities and inspections.
- Perform work with a trained crew and maintain continuous communication.
Pre-work risk assessment and planning
Start every rooftop task with a documented, site-specific risk assessment that identifies hazards, required controls, rescue procedures, and personnel competencies. Evaluate roof structure, load limits, and any fragile roofing components. Include atmospheric concerns such as nearby power lines, chemical exposures, or extreme temperatures. Risk assessments should be reviewed and signed by a qualified person and revisited if conditions change.
Incorporate vendor and contractor plans into your assessment to ensure consistency across teams. Coordinate schedules to minimize simultaneous trades on the roof, and establish exclusion zones around skylights and fragile areas. Consider logistics like tool tethering and trash containment to prevent dropped-object hazards to those below.
Document the assessment digitally for traceability and link it to job permits. Ensure findings are communicated during the pre-task briefing so all crew members understand specific hazards and controls for that shift.
Access control and safe routing
Control rooftop access with locked doors, keycards, or sign-in logs to prevent unauthorized entry. Designate safe walking routes with clear demarcation, non-slip surfacing where needed, and temporary barriers around hazards. Ensure ladder and stair access meet code and have secure handholds, and use man-safe systems where applicable for frequent access.
Plan ingress and egress to avoid carrying heavy equipment across fragile zones; use lifts or hoists to place heavy items directly where needed. Maintain clear emergency escape paths and ensure lighting is adequate for early-morning or evening work.
Periodic audits of access points identify wear, lock failures, or obstruction issues. Replace missing signage promptly and verify that temporary covers over skylights are rated and labeled for pedestrian traffic.
Fall protection system selection and verification
Select fall protection based on the risk assessment: passive systems (guardrails, parapets) are preferred, while active systems (lanyards, harnesses, temporary anchors) are used where passive measures aren’t feasible. Verify that anchors are rated to appropriate strength (typically 5,000 lb per OSHA for personal fall arrest anchors unless engineered otherwise) and that equipment has current inspection tags and certification.
Perform pre-use inspections each shift and document findings. Ensure compatibility between connectors, lanyards, and harnesses to prevent incompatible loading or unintended disengagement. Use horizontal lifeline systems or work positioning where continuous tie-off is necessary for mobility.
Include rescue planning as part of system selection—if a worker is suspended, a prompt rescue within minutes is essential to avoid suspension trauma. Have rescue equipment staged and trained personnel available before work begins.
Comparative assessment of rooftop fall protection methods
Guardrails, parapets, and edge protection comparison
Guardrails and parapets provide passive, continuously effective protection and are ideal for frequent roof access areas. They require initial installation cost but minimal per-use effort and maintenance if designed to code. Guardrails reduce reliance on personal fall arrest systems, lowering the need for individual harnessing and rescue complexity. For low-frequency work or on irregular rooflines, guardrails may not be practical and temporary solutions or PPE will be needed.
When designing guardrails, ensure they meet local height and load requirements, and that openings are minimized to prevent fall-through hazards. Parapets also serve as a wind break and can support rooftop equipment mounts. Consider sightlines and drainage when implementing physical edge protection to avoid unintended consequences.
Guardrails are particularly effective in buildings that host regular rooftop installations—HVAC servicing, rooftop gardens, or solar arrays—because they offer continuous protection without relying on worker behavior for proper use.
Personal fall arrest systems versus collective systems
Personal fall arrest systems (PFAS) such as harnesses, lanyards, and anchors protect individual workers and allow mobility, but require correct donning, compatible components, and a clear rescue plan. Collective systems like guardrails or nets protect multiple workers simultaneously and reduce procedural complexity but may be costlier to install. Selection depends on task frequency, roof geometry, and budgetary constraints.
PFAS demands rigorous inspection programs and training to ensure users tie off correctly and understand clearance calculations. Collective systems shift control from behavior to engineering, often improving reliability. In many projects, a combination—guardrails for frequently accessed edges and PFAS for edge-proximate maintenance—offers balanced protection.
Consider lifecycle costs: collective systems often amortize better over years of use, while PFAS has recurring equipment replacement and training expenses. Factor in administrative overhead for permits and rescue readiness when comparing options.
Comparison table of fall protection options
| Protection Type | Best Use Case | Pros / Cons |
|---|---|---|
| Guardrails / Parapets | High-frequency access, HVAC zones | Pros: continuous protection; Cons: installation cost, may affect roof edge drainage |
| Personal Fall Arrest (harness/anchor) | Mobile tasks, irregular edges | Pros: flexibility; Cons: user-dependent, requires rescue planning |
| Temporary Barrier / Warning Lines | Short-duration work, construction phases | Pros: low cost; Cons: less protective than guardrails |
| Safety Net Systems | High-work areas below roofline | Pros: collective catch; Cons: complex installation, limited use cases |
Equipment, PPE, and technical specifications for rooftop safety
Essential personal protective equipment
Personal protective equipment for rooftop safety typically includes a full-body harness, shock-absorbing lanyard or self-retracting lifeline, suitable connectors, and anchor points rated to industry standards. Non-slip footwear with puncture resistance and appropriate outerwear for weather are also necessary. Helmets with chin straps help protect against head injury from slips or dropped tools.
PPE must be selected to match the task and environment: for example, cold-climate work requires insulated gloves and fall protection compatible with bulkier clothing. Ensure all equipment meets relevant standards (ANSI/ASSP, EN, or national equivalents) and that inventory is tracked for age and inspection status.
Replace any PPE that shows impact, fraying, corrosion, or degradation. Maintain a log of equipment serial numbers, purchase dates, inspection outcomes, and retirement actions to demonstrate compliance and support procurement planning.
Anchors, lifelines, and hardware specifications
Anchors must be designed or certified to resist applicable loads—commonly 5,000 lb (22.2 kN) for a single-user anchor in the U.S., unless part of a designed system evaluated by an engineer. Horizontal lifelines, beam anchors, and roof-mounted anchors require engineering review to confirm structural compatibility with roof materials and connection points.
Select connectors and hardware with corrosion-resistant materials for rooftop exposure, and ensure all components are compatible to avoid unintended loading modes. Use shock-absorbing devices where free fall could occur to limit arrest forces on the worker and anchor points.
Inspect anchor points after severe weather or structural changes, and annually at minimum. Document certification and load tests performed by qualified personnel and store engineering documents for reference during audits or incident investigations.
Tool tethering, material handling, and dropped-object prevention
Dropped-object prevention is critical for rooftop operations—untethered tools can cause severe injuries below and damage equipment. Use tool lanyards, retention holsters, and secured storage for loose items. For material hoisting, use enclosed cages or dedicated lifts rather than hand-carrying heavy loads across roof surfaces.
Plan material layouts to avoid obstructing walking routes or drainage. When assembling scaffolds, solar arrays, or HVAC units on roofs, place barriers and signage at perimeter edges to prevent accidental roll-offs. Regular housekeeping minimizes trip hazards and reduces the likelihood of tools being dislodged by wind.
Consider cost-benefit: a tool tether costs $10–$50 per tool but can prevent multi-thousand-dollar property damage and potential lawsuits. Track dropped-object incidents to inform additional controls and training needs.
Benefits and business case for rooftop safety programs
- Reduced injury and fatality risk to workers and the public
- Lower insurance premiums and fewer claim payouts
- Improved regulatory compliance and reduced fines
- Increased operational uptime and fewer work stoppages
- Enhanced workforce morale and retention through safe practices
Financial and operational advantages
Investing in rooftop safety delivers measurable returns: fewer incidents reduce direct medical and legal costs while avoiding project delays and regulatory penalties. A proactive program can reduce lost-time injuries; according to the National Safety Council, workplace injuries cost U.S. employers over $171 billion annually in wage losses and medical expenses, underscoring the economic value of prevention (National Safety Council).
Operationally, scheduled maintenance and predictable access reduce emergency call-outs and improve equipment longevity. A documented safety program also streamlines contractor onboarding and can be a competitive differentiator for facility managers seeking qualified vendors.
Presenting rooftop safety as a capital investment—rather than a cost center—helps secure budget for guardrails, anchors, and training. Capture post-implementation metrics to quantify benefits and inform future allocations.
Quantifiable safety outcomes
Quantifying outcomes helps justify investments: track incident rates, near-miss counts, compliance audit scores, and mean time between repairs (MTBR) for rooftop assets. For example, reducing rooftop-related incidents by even 30% can lower insurance premiums and avoid costly OSHA citations. Reliable metrics support continuous improvement and targeted interventions where data shows persistent gaps.
Implement simple KPIs: number of inspections completed, percentage of workers trained in the last 12 months, and average time to rectify high-risk findings. Use digital systems for data aggregation to spot trends quickly and allocate resources where they’ll have the greatest impact.
Remember to benchmark against industry peers and standards to understand where your rooftop safety program stands and where to prioritize enhancements.
Return on investment and insurance considerations
Insurers often reward documented safety programs with lower premiums; conversely, repeated incidents can increase rates substantially. Include rooftop safety measures in safety management system audits to demonstrate commitment and negotiate favorable terms with carriers. Some insurers may request proof of training, inspection logs, and rescue plans before offering reduced rates.
When estimating ROI, factor in reduced downtime, avoided fines, and lower worker compensation claims. According to OSHA, fall protection requirements and enforcement reduce workplace fatalities in high-risk sectors, translating into savings in both human and financial terms (OSHA).
Documented maintenance and inspection programs also extend the lifespan of roof-mounted equipment by preventing weather-related and impact damage, further improving the investment case for rooftop safety systems.
Limitations, challenges, and realistic constraints
- Structural limitations of older roofs may preclude permanent anchors
- Weather variability can restrict safe work windows and increase costs
- Budget constraints may delay engineering controls, relying on PPE
Structural and architectural constraints
Older buildings or lightweight roof decks may not safely support permanent anchor installations without structural reinforcement, complicating compliance and increasing project costs. Engineering assessments can reveal load-bearing limitations, and retrofitting might require significant investment. Where anchors are infeasible, consider alternative controls like temporary counterweighted systems or perimeter guardrails where possible, always backed by engineering validation.
Roof penetrations from anchor installations can affect membrane integrity; coordinate with roofing specialists to select appropriate mounts and flashing methods to prevent leaks. Factor in maintenance access and potential future rooftop changes when designing anchor layouts.
Recognize that the best technical solution must balance safety, structural realities, and lifecycle costs. Prioritize high-risk zones for investment and plan phased upgrades to spread costs.
Operational and weather-related challenges
Rooftop work is highly sensitive to weather: wind over 25 mph, heavy rain, ice, or lightning make operations unsafe. Scheduling around favorable weather windows may extend project timelines. Additionally, rooftop clutter from installed equipment can restrict fall protection placements and complicate task sequencing.
Mitigate weather constraints by incorporating flexible scheduling, contingency plans, and real-time weather monitoring. For long-term projects, plan seasonal work sequences—performing weather-exposed tasks in dry months and indoor prefabrication in off-season periods.
Keep standby rescue resources ready; weather-related rescues can be more complex. Incorporate weather thresholds into permits and empower supervisors to halt work without penalty when conditions exceed defined limits.
Cost and resource limitations
Budget constraints often force facilities to rely on PPE rather than more reliable engineering controls. While PPE is necessary for residual risk, over-reliance increases administrative burden: training, inspection, and replacement costs accumulate. Competitive tendering and phased capital planning can make engineering solutions more attainable.
Explore grants, tax credits, or insurer incentives for safety upgrades. Prioritize interventions that reduce the greatest risk per dollar—guardrails for frequently accessed roof edges often deliver better protection per cost than equipping every worker with specialized fall-arrest systems.
Document cost-benefit analyses to advocate for investment. Include qualitative benefits—reputation, employee retention, and regulatory standing—alongside quantitative estimates when seeking approval from stakeholders.
Implementation tips, best practices, and maintenance
- Conduct annual engineered anchor and system inspections by qualified personnel
- Implement refresher training every 12 months and competence assessments
- Use digital inspections and photo records for audit trails
- Establish rescue teams with periodic drills and documented SOPs
- Integrate rooftop safety into contractor prequalification and permits
Training programs and competency building
Effective rooftop safety depends on regular, competency-based training: initial onboarding, annual refreshers, and task-specific briefings. Training should include hazard recognition, proper equipment use, anchor selection, tie-off techniques, and rescue procedures. Incorporate hands-on practice with harnesses, lanyard connections, and mock rescues to build muscle memory and confidence among crew members.
Assess competencies through observed practical evaluations, not just written tests. Maintain training records and require contractors to submit proof of equivalent training. Use toolbox talks to reinforce lessons from incidents and near-misses, ensuring continuous learning.
Consider blended learning—online theory plus in-person practical sessions—to scale training efficiently across teams while ensuring hands-on proficiency where it matters most.
Inspection, maintenance schedules, and documentation
Implement routine inspection schedules for anchors, lifelines, PPE, and guardrails. Daily visual checks before use, monthly formal inspections, and annual inspections by qualified technicians are common best practices. Document each inspection with date, inspector name, findings, and corrective actions, storing records centrally for audits and incident investigations.
Replace equipment according to manufacturer guidance or if any damage is detected; do not attempt field repairs for critical components unless authorized by the manufacturer. Track service life and retire items that exceed recommended durations even without visible damage.
Use digital maintenance management systems to schedule inspections, automate alerts for due actions, and generate compliance reports. This reduces administrative errors and ensures traceability across facility portfolios.
Rescue planning and emergency response
Rescue planning is non-negotiable: if fall arrest leads to suspension, physiological effects can incapacitate a worker in minutes. Create written rescue procedures with clear roles, equipment staging, and response time targets—ideally under 10 minutes for suspended-worker rescue. Train dedicated rescue teams and practice scenarios regularly to refine coordination and timing.
Equip rescue teams with appropriate kit: retrieval winches, rescue harnesses, retrieval lanyards, and first-aid equipment. Coordinate with local emergency services where necessary, and ensure rooftop access points are clearly marked and unlocked during work periods to allow rapid entry for responders.
Document rescue drills and review performance to identify delays or equipment gaps. Update rescue plans after changes to roof layout, anchor locations, or work procedures to keep them current and effective.
Conclusion
Rooftop safety is an essential component of responsible facility management, combining regulatory compliance, engineering controls, PPE, and thorough training to reduce falls and injuries. Implementing a rooftop safety checklist, conducting robust risk assessments, and investing in both passive and active protections delivers measurable safety and financial benefits.
Start by assessing your roof hazards, prioritizing engineering controls, and establishing documented inspection and rescue procedures. Use training and ongoing audits to sustain performance and create a safer workplace for everyone involved in rooftop operations. Prioritize rooftop safety today and protect your people and assets tomorrow.
Frequently Asked Questions
What is rooftop safety?
Rooftop safety refers to the policies, controls, equipment, and training designed to prevent falls, injuries, and property damage during work performed on roofs. It includes hazard assessments, fall protection systems (guardrails, harnesses, anchors), access controls, maintenance procedures, and rescue planning. Effective rooftop safety integrates engineering controls with administrative measures and personal protective equipment to reduce risk for workers and passersby.
How does rooftop fall protection work in practice?
Rooftop fall protection combines measures like guardrails, anchors, lifelines, and harnesses to either prevent a fall or arrest one safely. Passive measures such as guardrails eliminate exposure, while active systems require correct use and tie-off. Implementation involves choosing the right system for the task, verifying hardware ratings, conducting pre-use inspections, and ensuring a rescue plan is in place for prompt recovery if a fall occurs.
What is the difference between guardrails and personal fall arrest systems?
Guardrails are collective, passive protections that provide continuous edge protection without worker action, ideal for routine access areas. Personal fall arrest systems (PFAS) rely on individual harnesses and anchors to arrest a fall, offering mobility but requiring correct use and rescue readiness. Guardrails reduce reliance on human behavior, while PFAS is necessary where guardrails aren’t feasible due to roof design or specific tasks.
When should I use a horizontal lifeline versus fixed anchor points?
Use horizontal lifelines when workers need to move laterally along a roof edge and require continuous tie-off for mobility; they are suitable for linear work paths and areas where multiple tie-off points would be impractical. Fixed anchors are ideal for single-point tasks or as personal connection points. The choice depends on roof geometry, number of users, and engineered load capacity, and should be validated by a qualified person.
How much does a rooftop safety program cost?
Costs vary widely: basic PPE per worker can range from $150–$600 annually; engineered anchors and professional installation for a single anchor can range from $500–$3,000 depending on roof complexity. Guardrail installation may cost $50–$250 per linear foot. According to industry estimates, a comprehensive rooftop safety program for a medium facility typically involves initial capital of several thousand dollars plus recurring training and inspection costs, offset by reduced incident-related expenses and insurance benefits.


